I believe anyone would like to study new technologies “on the fly”. Any extra-efforts which may arise in comprehending some difficult subject may disgust that person and cause him or her to stop doing it. To me, it would seem kind of obvious why this is so.
To be honest, I would like to be considering a bit about features which were presented in ASP.NET starting from the 6th version and the possibilities that appeared after that in part of high-quality validation of custom data based on usage of the Minimal API filters but I would not like getting too deep into that to keep the topic simple. Let’s just focus on integration of the well-known package ‘FlatValidator’ into a custom application.
A little retrospect into the past. The Minimal API was announced as a flexible software technique designed to serve HTTP-routing in server-side applications. Previously, the architecture model of the controllers was used for development but the implementation of the Minimal API has given some feeling the time of the controllers is inexorably running out.
If you have heard nothing about all this, it does not matter because further discussion will bring some clarification, now I am just marking the boundaries of the issue that is currently being studied.
Endpoint filters are known mainly within the framework of the Minimal API technique, although they are also available for MVC and Razor Pages. The filters look like a cross between the endpoint request handler itself and middleware. The term ‘middleware’ means a software module embedded into the HTTP-request processing chain, the modules are executed sequentially, one after the other. Why am I mentioning this? Previously, middlewares were often used for data validation. Now there is a more preferable method like an implementation of the ‘IEndpointFilter’ interface.
The simplest implementation code for ‘IEndpointFilter’ may look like the codes below:
public class MyFilter: IEndpointFilter
{
   public async ValueTask<object?> InvokeAsync(
       EndpointFilterInvocationContext context,
       EndpointFilterDelegate next)
   {
       var result = await next(context);
       if (result is string s)
       {
           result = s.Replace("vodka", "pineapple juice");
       }
       return result;
   }
}
Let’s explore what happens here. We execute the next(…) method which will call the endpoint handler and return a response with user data. Next step it replaces the fragment `vodka` with the phrase `pineapple juice’ in the response. Everything is absolutely simple.
In this example we add our custom processing after executing the next(…) method, such an approach is called post-processing. In case we do some processing before executing the next() method, it will be called pre-processing.
Let’s try to use implemented codes within the Minimal API application.
var builder = WebApplication.CreateBuilder(args);

var app = builder.Build();

var group = app
   .MapGroup(string.Empty)
   .AddEndpointFilter<MyFilter>();  // <==

group.MapGet("/", () => "Hello World");
group.MapGet("/drinking", () => "I like to drink vodka!");

app.Run();
Attempting to call the endpoint ‘/drinking’ will lead to returning the phrase `I like to drink pineapple juice!’. Such a surprise for one who loves to drink vodka.
So, now the filters of the Minimal API have been sorted out a bit, it is time to switch to a more real-life example. First of all, let’s install the main ‘FlatValidator’ package via NuGet, it will help us to validate our data in a professional manner.
❯ dotnet add package FlatValidatorThe documentation of the package page says the validator is provided to be used in two approaches: inline and derived.
Inline approach allows to define the validation rules at the verification point directly. It may be preferable for some cases and may give developers some advantages since they will be able to see the logic “in place”.
On the other hand, if the project has some conceptual requirements regarding the isolation and structure convention of the business logic, it may be easier to use the classic approach with inheritance of the ‘FlatValidator<TModel>’ class.
Let me show a slightly modified example from the documentation, the inline approach is used here:
// use asynchronous version
var result = await FlatValidator.ValidateAsync(model, v =>
{
   // m == model, IsEmail() is one of funcs for typical data formats
   v.ValidIf(m => m.Email.IsEmail(), "Invalid email", m => m.Email);

   // involve custom userService for specific logic
   v.ErrorIf(async m => await userService.IsUserExistAsync(m.Email),
             "User already registered", m => m.Email);
});
if (!result) // check the validation result
{
   return TypedResults.ValidationProblem(result.ToDictionary());
}
In fact, the ‘ValidIf’ and ‘ErrorIf’ functions are the validation rule definitions here. The number of such rules are not limited. The ‘TypedResults.ValidationProblem’ is a part of .NET 6+, it will return error(s) in the HTTP-response in case it occurs.
The application code part in the concept of inline-mode may look like this:
var builder = WebApplication.CreateBuilder(args);
builder.Services.AddProblemDetails();

var app = builder.Build();

// Endpoint aka https://localhost:5000/todos/
app.MapPost("/todos", (Todo todo) =>
{
   var result = FlatValidator.Validate(todo, v =>
   {
       v.ErrorIf(m => m.Title.IsEmpty(), "Invalid title.", m => m.Title);
   });
   if (!result)
   {
       return TypedResults.ValidationProblem(result.ToDictionary());
   }

   // ....
   return Results.Ok();
});

app.Run();

// Model to test validation functionality
public record Todo(string Title, bool IsComplete = false);
Pay attention, both synchronous and asynchronous versions are presented in the FlatValidator class.
If the inline approach does not seem appropriate enough to you for some reason, you can derive the FlatValidator<> and create an independent class.
var builder = WebApplication.CreateBuilder(args);
builder.Services.AddProblemDetails();

var app = builder.Build();

app.MapPost("/todos", (Todo todo) =>
{
   var result = new TodoValidator().Validate(todo);
   if (!result)
   {
       return TypedResults.ValidationProblem(result.ToDictionary());
   }

   // ....
   return Results.Ok();
});

app.Run();

// Model to test validation functionality
public record Todo(string Title, bool IsComplete = false);

// Implement custom validator for the model Todo
public class TodoValidator : FlatValidator<Todo>
{
   public TodoValidator()
   {
       v.ErrorIf(m => m.Title.IsEmpty(), "Invalid title.", m => m.Title);
   }
}
For separated logic such definition manners may look neater. It is clear that the classes ‘Todo’ and ‘TodoValidator’ should each be in their own file.
Well, now we have one step left before implementing a real validation filter. First of all, we have to write the logic of the validator calling directly in the filter implementation.
app.MapPost("/todos", (Todo todo) =>
{
   return Results.Ok();

}).AddEndpointFilter<ValidationFilter<Todo>>();  // <==


public class ValidationFilter<T>(
         IServiceProvider serviceProvider
) : IEndpointFilter
{
   public async ValueTask<object?> InvokeAsync(
       EndpointFilterInvocationContext context,
       EndpointFilterDelegate next)
   {
       var validators = serviceProvider.GetServices<IFlatValidator<T>>();
       foreach (var validator in validators)
       {
           if (context.Arguments.FirstOrDefault(x =>
                   x?.GetType() == typeof(T)) is not T model)
           {
               return TypedResults.Problem(
                   detail: "Invalid parameter.",
                   statusCode: StatusCodes.Status500InternalServerError
               );
           }

           var result = await validator.ValidateAsync(model);
           if (!result)
           {
             return TypedResults.ValidationProblem(result.ToDictionary());
           }
       }

       // call next filter in the chain
       return await next(context);
   }
}
Have you noticed? The body of the endpoint .MapPost(“/todos”) generally has been got rid of any logic related to validation at all! All logic is in the filter now.
The validation is guaranteed by .AddEndpointFilter<ValidationFilter<Todo>>.
Since our filter is generic, it may be appropriate for any model type, so that it is enough to implement the class of the validator and register it in the ‘IServiceCollection’.
// register a validator for the Todo model
builder.Services.AddScoped<IFlatValidator<Todo>, TodoValidator>();
However, there are no problems with this either. If you would like to automate the registration of all your validators, just use the small NuGet additional package FlatValidator.DependencyInjection.
❯ dotnet add package FlatValidator.DependencyInjectionIt helps you to seek and register all validators in the application.
var builder = WebApplication.CreateBuilder(args);
builder.Services.AddFlatValidatorsFromAssembly(Assembly.GetExecutingAssembly());
In general, to get better acquainted with the capabilities of the ‘FlatValidator’ package, I recommend taking a look at the project page, which contains documentation and some good examples.
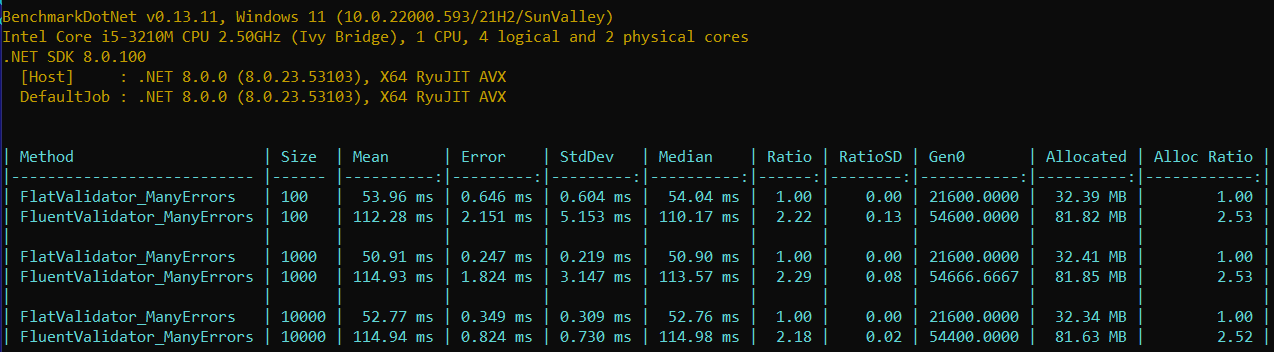
It’s no secret that writing productive code is quite difficult. Often, it is no less difficult to read optimized codes later with understanding because final performance and code clarity are sometimes two completely different things. Nevertheless, the ‘FlatValidator’ package managed to get fantastic performance with optimizing source codes but at the same time keeping these codes readable.
And finally, a couple of words about performance. A picture below demonstrates the comparative performance and memory usage. The benchmarks themselves may also be found on the project page, may be downloaded and tested.