WebRTC integrations have emerged as a game-changer in the Video Calling Technology over the years. The protocol has redefined the way real-time video communications take Developers can integrate WebRTCs commonly available as JavaScript APIs to add audio and video solutions to their apps. place. Developers can integrate WebRTCs commonly available as JavaScript APIs to add audio and video solutions to their apps. This tutorial will take you through the steps in developing a two-way video call between two devices.
WebRTC (Web Real-Time Communication) is a set of rules that can establish bidirectional and full-duplex communication between our two devices using JavaScript. It connects your devices and enables transfer of unlimited real-time audio and video across any operating system. However, the WebRTC agents created for both devices do not know any information about each other inorder to establish the media exchange. At this point, a third, mutually agreed-upon server is introduced. This server which connects the devices to transfer data with necessary information about the endpoints is known as the Signaling Server.
Before we start off with the steps, it is necessary to become familiar with the basics of the integration process.
WebRTC Signaling
Session Description Protocol (SDP)
ICE Candidates
STUN & TURN Server
Peer connection
1. WebRTC Signaling
Signaling is the process of determining the necessary information about the peers before the exchange of media takes place. During this process, the Signaling server collects details like session control information, network information and media data like channels, codecs and formats.
The Signaling Server acts as an intermediary between the devices while protecting their private information from any potential threats. It does not affect the data transfer between the peers in any way. This is because the server is capable of exchanging data even without understanding or interpreting the media that passes through it. It typically treats the content as a ‘black box' and acts only as a middleman. Consequently, you can use any communication protocols like WebSocket or XMLHttpRequest to establish the two-way media transfer.
2. Session Description Protocol (SDP)
The Session Description Protocol (SDP) is a plain-text protocol that contains a set of media descriptions in a Session description. Each media description is used to map unique video streams.
Generally WebRTCs do not specify any method or protocol for the signaling process. In this case, we will use Socket.IO for signaling. The media is exchanged between the peers as ‘Offers’ and ‘answers’. During the SDP relays between the peers, the Offers and answers occurs as below:
v=0
o=- 7614219274584779017 2 IN IP4 127.0.0.1
s=-
t=0 0
a=group:BUNDLE audio video
a=msid-semantic: WMS
m=audio 1 RTP/SAVPF 111 103 104 0 8 107 106 105 13 126
c=IN IP4 0.0.0.0
...
Do not worry if the above lines are all Greek to you. WebRTCs automatically create these details based on the audio and video details detected in your device.
3. ICE Candidates
Apart from the media data collected by the SDPs, the WebRTC also requires routing information necessary to establish connection with the remote device. This information is described by the Interactive Connectivity Establishment (ICE) candidates in the signaling process.
In general, the peers propose the candidate in the order from best to worst. The candidates can be UDPs - User Datagram protocol, since these rules help streams recover from network instabilities effortlessly. Otherwise, the standard TCPs - Transmission Control Protocols are also allowed.
4. STUN & TURN Server
STUN (or Session Traversal Utilities for Network Address Translator (NAT)) server is a set of standards that create NAT mappings that return the IP address, port and connectivity status of a networked device.
The STUN server creates a space for exchanging contact information between the computers. After the information exchange completes, the STUN server establishes connection between the peer computers. The STUN server is excluded from the rest of the conversation.
During a WebRTC communication, the STUN servers establish the most ideal and economical connections. Each peer uses a different NAT. This may cause connection failures to some users.
In these situations when direct connections are down, TURN (Traversal Using Relays around NAT) servers are used as fallbacks as required by the ICE protocol.
TURN ( or Traversal Using Relays around NAT) server: is a set of rules that helps devices exchange data between each other, behind a NAT or Firewall.
It differs from the STUN server by handling the complete communication session between the devices.
Generally, once a TURN server establishes connection between the peers, it receives and relays video streams from one device to another and vice versa.
The communication established via this process is costly and the host is subjected to pay a huge fee for the complete processing and bandwidth load.
5. Peer Connection
RTCPeerConnection is an interface that connects the local and remote peers via a WebRTC connection.
It controls the connection in terms of maintenance and monitoring of the remote peer. It executes closure of the connection when it is not necessary anymore.
EventTarget ← RTCPeerConnection
Workflow
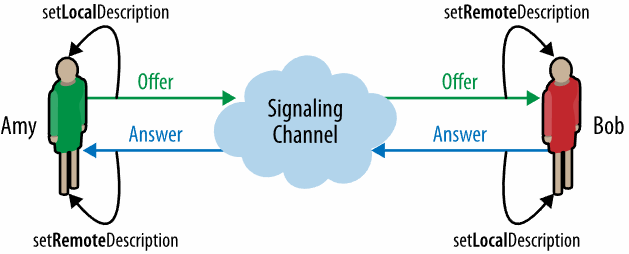
Step 1: Exchanging Session Descriptions
At the start of the signaling process, the user initiating the call creates an offer.
This offer carries a session description that abides by the SDP standards. This description has to be delivered to the callee, which is the receiving user. The caller which also contains the SDP description gives back an answer message to the offer.
The Signaling server uses WebSockets to exchange the offer and answer messages. Here the message for the offer is with the type "video-offer" and answer with "video-answer"
Step 2: ICE Candidates Exchange
To negotiate actual connections between the peers, they need to exchange the ICE candidates. The ICE candidates describe the communication method that can be used by the sending peer. As the peer discovers each candidate, it starts sending them in an order even if the video streaming has already started.
The local description addition using pc.setLocalDescription(offer) is performed by sending the ICE candidate event to the RTCPeerConnection.
The peers agree on a mutually acceptable candidate. The peers manage the connection using the SDP of this candidate through which the flow of media starts. The peers may change the stream formats if they agree on a high-performing candidate in the future.
Even if not supported currently, it is possible for the candidate to downgrade connections to a lower bandwidth if it has been started after the media flow had begun.
Through the signaling server, a JSON message of type "new-ice-candidate" is sent to the remote peer when each ICE candidate is sent to a different peer.

Step 3:Making a call
When a callee invites a different user from the list of users, the invite() function can be invoked.
var mediaConstraints = {
audio: true, // We want an audio track
video: true // ...and we want a video track
};
function invite(evt) {
if (myPeerConnection) {
alert("You are already in another call.");
} else {
var clickedUsername = evt.target.textContent;
targetUsername = clickedUsername;
createPeerConnection();
navigator.mediaDevices.getUserMedia(mediaConstraints)
.then(function(localStream) {
document.getElementById("local_video").srcObject = localStream;
localStream.getTracks().forEach(track => myPeerConnection.addTrack(track, localStream));
})
.catch(handleGetUserMediaError);
}
}
Step 4:Creation of Peer Connection
Both the caller and callee build RTCPeerConnection objects using the createPeerConnection() function. To start a call, the caller invokes invite() and to receive the offer message from the caller, the callee invokes handleVideoOfferMsg()
function createPeerConnection() {
myPeerConnection = new RTCPeerConnection({
iceServers: [ // Information about ICE servers - Use your own!
{
urls: "stun:stun.stunprotocol.org"
}
]
});
myPeerConnection.onicecandidate = handleICECandidateEvent;
myPeerConnection.ontrack = handleTrackEvent;
myPeerConnection.onnegotiationneeded = handleNegotiationNeededEvent;
myPeerConnection.onremovetrack = handleRemoveTrackEvent;
myPeerConnection.oniceconnectionstatechange = handleICEConnectionStateChangeEvent;
myPeerConnection.onicegatheringstatechange = handleICEGatheringStateChangeEvent;
myPeerConnection.onsignalingstatechange = handleSignalingStateChangeEvent;
}
It is necessary that we specify an object to mention the configuration parameters of the connection while using the RTCPeerConnection() constructor. In this context, we will use only one as an example - iceServers.
When the ICE layer tries to establish a connection between the caller and the callee, the object iceServers describes the STUN and TURN servers that perform the routing.
Both these servers are used to identify the best route and protocols necessary to establish communication between the peers, even if they are secured by firewalls and NATs.
Step 5:Initiating Negotiation
The caller creates a RTCPeerConnection establishing a media stream and tracks addition to the connection. Following this, the browser will indicate the necessity of a negotiation via a negotiation needed event. Below is the code that can handle the event:
function handleNegotiationNeededEvent() {
myPeerConnection.createOffer().then(function(offer) {
return myPeerConnection.setLocalDescription(offer);
})
.then(function() {
sendToServer({
name: myUsername,
target: targetUsername,
type: "video-offer",
sdp: myPeerConnection.localDescription
});
})
.catch(reportError);
}
Inorder to initiate a negotiation process, we need to create and SDP offer and send it to the receiving peer. This offer carries all the configuration parameters of the connection that includes information about the media streams in the local connection and ICE candidates brought together by the ICE layers previously.
Step 6:Session negotiation
By now, we have initiated the negotiation process with the other peer and sent an offer. It is time we check on the connection in the callee’s side:
The callee gets the offer from the caller and uses the handleVideoOfferMsg() to begin the process. Below, we will learn how the callee handles the “video-offer” message.
Step 7:Incoming call
The callee receives the handleVideoOfferMsg() function along with the "video-offer" message. Firstly, the function establishes a RTCPeerConnection followed by the addition of audio and video tracks from the microphone and webcam. Secondly, it constructs the answer to the offer and sends it across.
function handleVideoOfferMsg(msg) {
var localStream = null;
targetUsername = msg.name;
createPeerConnection();
var desc = new RTCSessionDescription(msg.sdp);
myPeerConnection.setRemoteDescription(desc).then(function () {
return navigator.mediaDevices.getUserMedia(mediaConstraints);
})
.then(function(stream) {
localStream = stream;
document.getElementById("local_video").srcObject = localStream;
localStream.getTracks().forEach(track => myPeerConnection.addTrack(track, localStream));
})
.then(function() {
return myPeerConnection.createAnswer();
})
.then(function(answer) {
return myPeerConnection.setLocalDescription(answer);
})
.then(function() {
var msg = {
name: myUsername,
target: targetUsername,
type: "video-answer",
sdp: myPeerConnection.localDescription
};
sendToServer(msg);
})
.catch(handleGetUserMediaError);
}
In this code, the createPeerConnection() function creates and configures the RTCPeerConnection similar to the process under Starting a call. After this step, it gets the session description from the "video-offer" message and establishes a new RTCSessionDescription.
Step 8:Transmission of ICE Candidates
Sending ICE Candidates
During the negotiation process, the ICE candidates are exchanged between the peers until the potential ways for the RTCPeerConnectionfor media transfer is completely exhausted. At this stage the ICE is unaware of your signaling server, the ICE candidate event takes place using your handlers for the exchange process.
Here, your onicecandidate handler receives an event with SDPs that contain candidate description. In some cases, the SDP is null if the ICE layer has exhausted the configuration suggestions. You need to transmit the candidate data via the signaling server. The implementation is as follows:
function handleICECandidateEvent(event) {
if (event.candidate) {
sendToServer({
type: "new-ice-candidate",
target: targetUsername,
candidate: event.candidate
});
}
}
This constructs an object with the candidate and sends it to different peers by calling the sendToServer() function via the signaling server.
Receiving ICE candidates
Regardless of the method, the destination peer receives the ICE candidates from the signaling server. Herein the example is a JSON object "new-ice-candidate" called as a string. The main WebSocket incoming message code calls the handleNewICECandidateMsg() function to handle the messages.
function handleNewICECandidateMsg(msg) {
var candidate = new RTCIceCandidate(msg.candidate);
myPeerConnection.addIceCandidate(candidate)
.catch(reportError);
}
This function passes the SDP received into its constructor and creates an RTCIceCandidate object. Next, it passes it into the myPeerConnection.addIceCandidate() to deliver the candidates into the ICE layer. This delivers a new ICE candidate to the local layer. Thereby, we’ve successfully completed the process of handling this candidate.
